Enemies You Meet Normally
NUMB BODY

Location: Central Square Mall (Normal and Alternate), Underpass, Hilltop Center
Attack Method: Numb Bodies will attempt to damage Heather by ramming into her at close range.
Best Tactics: Numb Bodies aren't particularly difficult, so it's probably best to use melee weapons to conserve ammunition. However, as the difficulty level increases, you may want to consider using firearms. Numb Bodies are often in fairly narrow hallways, so exercise caution when more than one of them are around.
GLUTTON

Location: Hill Top Center (other world)
Attack Method: The glutton does not attack you but it's a major obstacle to continue the game.
Best Tactics: You need to find all pieces of the story Tu Fui, Ego Eris,
Attack Method: The glutton does not attack you but it's a major obstacle to continue the game.
Best Tactics: You need to find all pieces of the story Tu Fui, Ego Eris,
CLOSER

Location: Central Square Mall (Normal and Alternate), Lakeside Amusement Park, Church
Attack Method: Closers will either attack by swinging one of their arms at you, or by swinging both arms in a spinning attack.
Best Tactics: Closers are BIG, and they're fond of using that fact to their advantage. Closers, as the name suggests, like to "close off" your escape route if you choose to run from them, meaning it's bad to leave more them two of them alive on any difficulty higher than Normal. Ranged weapons are your best bet, but attacking from the back with a melee weapon is also efficient. Just be sure to get out of range before the Closer retaliates with an arm swipe or spin attack.
DOUBLE HEAD

Location: Central Square Mall (Normal and Alternate), Subway, Hilltop Center (Normal and Alternate), Silent Hill, Brookhaven Hospital (Alternate), Lakeside Amusement Park
Attack Method: Double Heads will either attack by lunging at you from a distance or biting you at close range.
Best Tactics: These dog-like can be a pain in groups, so it's best to focus on killing or at least knocking one down as quick as possible. Using the handgun is probably your best bet on lesser to normal difficulties, and the shotgun is handy on harder difficulties or when they're lunging at you in packs. Melee weapons work well, too, but use caution when there's more than one around. While exploring the town of Silent Hill, they'll howl when they see you and attack shortly afterward, so be ready.
PENDULUM

Location: Hilltop Shopping Center (Alternate), Underpass, Construction Site, Silent Hill, Lakeside Amusement Park, Church
Attack Method: Pendulums will either be floating in the air or walking on the ground. While floating, they'll lunge at you in a straight line or attack you at close range. On the ground, they'll attack you at close range by rotating their body. Shooting at them while floating will cause them to lunge at you with great speed.
Best Tactics: It's best to just avoid Pendulums, but use ranged weapons if you're forced to fight. Floating Pendulums give themselves away with an annoying screeching/scraping sound, so if you're planning to run past one, it's best to play things by ear. If you're forced to use a melee weapon, use something with longer range, such as the maul or the steel pipe.
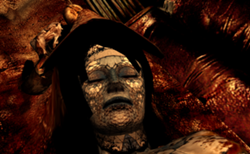
INSANE CANCER

Location: Subway, Construction Site, Hilltop Center (Normal and Alternate), Church
Attack Method: Insane Cancers will only attack you while standing, and do so by swinging at you with their arms.
Best Tactics: These big guys will always be lying down at first, so take the opportunity to run by them if you can. Doing this in narrower hallways may be more difficult, but it's possible to push them out of the way by nudging into them. Otherwise, the shotgun was practically made to deal with Insane Cancers. Their wide girth is sufficient enough to take the full range of a shotgun's bullet spread, so let 'er rip at medium to close range. The Submachine Gun is also a great ranged weapon to use. When using a melee weapon, attack from the backside with caution. Also, Insane Cancers are only dead when they deflate (they'll also make a very distinct sound when they die), so be careful until you've confirmed that.
SLURPER

Location: Hilltop Center (Alternate), Brookhaven Hospital (Alternate), Church
Attack Method: Slurpers attack at medium to long range by crawling fast in a straight line and knocking you flat on your ass. At close range, they'll grapple with you and cause damage.
Best Tactics: These guys are a serious pain in the ass. Running by them without getting grappled or knocked down is very difficult, so it's best to use something with stopping power, like the Shotgun, to at least down them before running by. Any other weapon, including most melee weapons, don't have the stopping power to keep these guys away from you (and if they do have the stopping power, they're usually too slow).
NURSE

Location: Brookhaven Hospital (Nightmare and Alternate)
Attack Method: Nurses will either be carrying a steel pipe or a revolver, and will use them accordingly. Nurses with revolvers will attack at medium to long range, and nurses with steel pipes will attack at short to medium range.
Best Tactics: Nurses can be hard to defeat and require many hits, so use caution when fighting them. Melee weapons are extremely difficult to use against Nurses, due to their long attack range with both the revolver and the steel pipe. As long as you keep your distance, the Handgun works nicely. The Shotgun can be used when multiple nurses are bearing down upon you, but remember to conserve your shotgun ammo if you need to.
SEWER MONSTER

Location: The Underpass
Attack Method: Strangling
Best Tactics: The Creature itself can be found a little further on, in the water below the path that Heather must cross. The first time Heather crosses the path, before reading the note, the creature can be seen moving below her for a few seconds. She must kill the monster with a hairdryer before passing by, or it will grab onto her leg and pull her into the water. Its appearance looks like a rather small eel, or leech-like monster with no visible mouth or eyes, and is flesh-pink in colour.
SCRAPERS

Location: Church
Attack Method:Scrapers will take a swipe/stab at you with their bladed arms at medium to close range.
Best Tactics: Scrapers fight almost exactly like the Missionary boss, except you encounter them in fairly to extremely narrow hallways/walkways. Unless you're lucky or skilled enough to run past them, attacking from the front with either the Shotgun or Submachine Gun is your best bet. He will almost always deflect your Handgun shots from the front, and getting in close for melee will all but ensure a swift beating, so exercise caution. If this sounds scary, that's because it is... but thankfully, you only encounter them very briefly in the Church, so deal with them quickly and get it over with.
VALTIEL

Location: Central Square Mall (Alternate), Hilltop Center (Alternate), Brookhaven Hospital (Alternate), Church
Attack Method: Valtiel doesn't attack you, nor does he show any interest in doing so.
Best Tactics: Have fun watching him do different things in different places: twitching his head extremely fast, turning a valve, crawling in a narrow space. He also may appear to drag you off when you die, pending certain conditions. Watch for him during the final boss fight, as well.
BOSSES
SPIT WORM

Location: Central Square Mall (Alternate)
Attack Method: Split Worm has multiple methods of attack. He’ll use two different methods of biting you, and both do pretty large amounts of damage. He can slam the ground, which freezes you in your tracks if you were moving at that point in time. On Hard difficulty and above, Split Worm will employ and intant kill attack. He’ll let off a roar when he’s about to do this, so be on your guard.
Weakness: Use the Handgun, as it’s your only ranged weapon at this point in the game (unless you have a special item, of course).
Best Tactics: Split Worm will emerge from one of the six holes on either side of the room, so pay careful attention by pressing L2 to see where he’ll emerge next. Only attack when he opens his mouth, as that’s the only time damage can be dealt. Stay on your toes, since he’ll slither across the room to another hole once he closes his mouth. Just keep Split Worm’s attack methods in mind, watch where he emerges, and plug away with the Handgun when his mouth is open; he should fall relatively quickly.
Missionary

Location: Daisy Villa Apartments – Rooftop
Attack Method: The Missionary has many different types of attacks, but they can be divided into three main categories: moving, stationary, and counter attacks.
Weakness: Shotgun, shotgun, shotgun. Not only does it drop him fairly quickly, but it’ll knock him back. Attack from the side or the back to avoid having your bullets deflected.
Best Tactics: Don’t stand still for too long, otherwise you’ll get pulverized. Strafing while using L2 to keep the Missionary in your sights is the best way to move around. After he does his running attack, you’ll probably be able to quickly move around him and let off an attack. If he’s knocked down, chances are he’s not dead, so fire at him on the ground a couple of times and back up. Just keep moving, don’t get too close to him, and attack from the side or the back. You’ll know he’s dead when you hear a deafening roar.
LEONARD WOLF

Location: Brookhaven Hospital (Alternate)
Attack Method: Leonard will only attack when you’re in close. He can attack while standing by swiping with his arms, attack while rising from under the water, and counterattack after being hit when you’re in close.
Weakness: Ranged attacks. Melee is difficult because of his swift counterattack.
Best Tactics: Just keep moving, and watch for him while he’s swimming underwater. Use the Handgun if you need to conserve ammo, but this may take a while, so use the shotgun if you can when you’re at medium range. Don’t get too close when attacking, or he’ll let off a counterattack (this is capable of hitting you easily even when attacking from behind, so watch for it).
MEMORY OF ALESSA

Location: Lakeside Amusement Park
Attack Method: Memory of Alessa will attack according to the weapon she has equipped, using both melee and ranged attacks. The guns are capable of melee attacks, too. She cycles through her weapons in this order: Knife, Handgun, Steel Pipe, Submachine Gun.
Weakness: She’s very predictable, and she has a small variety of attacks. Probably the only boss fight where melee weapons are encouraged, just to save ammunition.
Best Tactics: You’ll be wanting to use the katana or steel pipe for the majority of this fight. She’s incredibly easy when she has the Knife, so just swing at her when she gets close enough to attack. Her Handgun form is a bit more difficult, but you can get around that by staying close enough for melee attacks. Her melee attacks are far less damaging than her ranged attacks, so stay in close. Her Steel Pipe form has a bit more reach on its attack than the Knife, but it’s not very damaging, so feel free to get in close for melee strikes. Her Submachine Gun form may be a bit more difficult. Use the same strategy as for her Handgun form, and make sure that she doesn’t hit you with ranged.
GOD
Location: Church (Alternate)
Attack Method: God uses three types of melee attacks: an arm swipe while standing (which does massive damage, by the way. be especially careful of this), an arm swipe while lying down, and a bite attack while lying down. She can also send out trails of fire throughout the battle, which will follow and attempt to hit you.
Weakness: Pretty predictable when attacking. It’s easy to judge the range of her attacks, with the possible exception of the fire trails.
Best Tactics: All of God’s attacks are extremely damaging, so you need to develop a pattern of attacking and dodging. Use ranged weapons until you run out of ammo, then switch to melee attacks (but only attack when she’s lowered to the ground). There should be a semi-circle shaped mark on the ground: that’s the range of God’s swipe attack when she’s on the ground. Only get 2-3 melee hits on her while she’s lying down, then quick turn and run out of there to avoid being hit. Watch the flames carefully and dodge them accordingly.
